 DXL360sV2.2013Aug中英文说明书

《DXL360sV2.2013Aug中英文说明书》由会员分享,可在线阅读,更多相关《DXL360sV2.2013Aug中英文说明书(41页珍藏版)》请在装配图网上搜索。
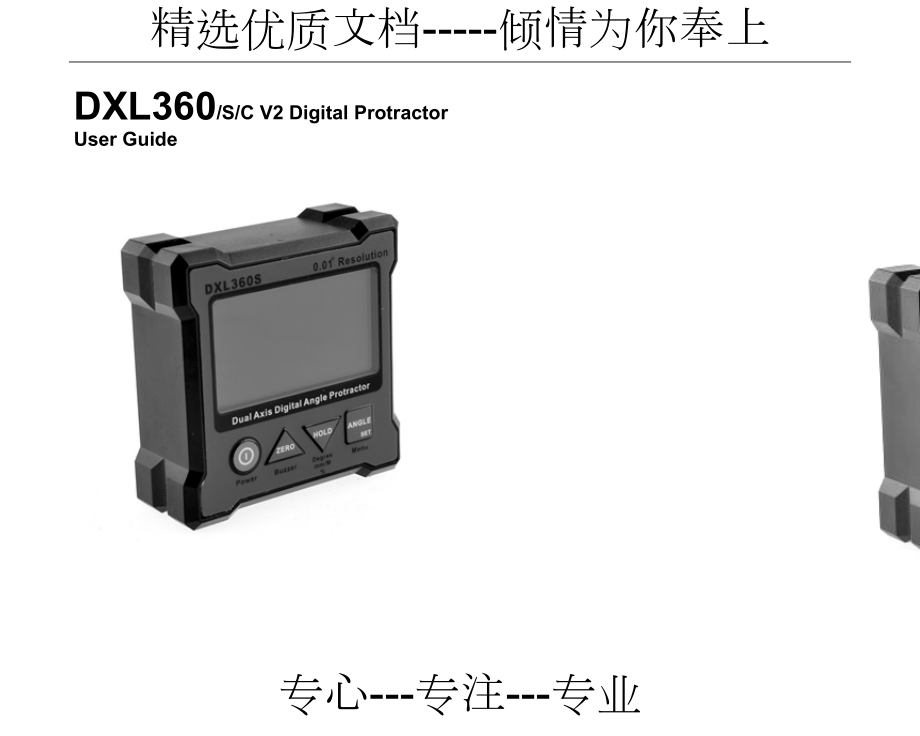
1、精选优质文档-----倾情为你奉上 DXL360/S/C V2 Digital Protractor User Guide Features: 1) DXL360S/C: High accuracy ±0.05°, high resolution 0.01° DXL360: ±0.1°, resolution 0.02°, detail check specification 2) Dual and Single axis with user friendly LCD display angle 3) Rechargeable 4) V Shape meta
2、l case for easy to fit at the corner or pipe. 5) 5 Side Magnetic base 6) Audible alarming at settable angle range 7) Any angle measurement *DXL360s/c only 8) USB / Bluetooth to pc connection need adapter for DXL360 and DXL360s/c. Specifications Accuracy: DXL360S/C: 0 to 20°: ± (0.05
3、°) 20 to 70°: ± (0.1°) 70 to 90°: ± (0.05°) DXL360: 0 to 20°: ± (0.1°) 20 to 70°: ± (0.2°) 70 to 90°: ± (0.1°) *After Calibrated Measuring range: Single axis: 360°, Dual axis: ±40° Resolution: DXL360S/C: 0.01° DXL360: 0.02° Any Angle Measurement 0.5°
4、Accuracy *DXL360s/c: Gyro Rotation Speed *DXL360s/c: <50°/s Response time: <0.4 second Audio sound: 60dB @ 30cm Zero offset drift angle per °C: 0.0058° (typical) Operating temperature: 0 to 50°C Storage temperature: -10 to 60°C User Interface: Mono-color LCD with backlight Supply Powe
5、r: Rechargeable Li-Polymer 3.7V Charger port: 5V 500mA Mini type-B USB port Power Consumption: Standby: 10uA, Operation: 20mA. Standby Battery Life: 4000 hours Operating Battery Life: 40 hours Dimensions (in mm): 70(L) x 70(W) x 23(H) Magnetic Base: affix at 4 corner Magnetic Force:
6、N48 Weight: 120gram Button Functions Button Function Descriptions Normal Mode MENU Mode POWER In normal operation, this button turns the device ON/OFF. Serves as the escape key at menu mode ZERO When pressed, the current reading is set to zero; subsequent measurements are relative
7、to this reading. The LCD will show theicon to indicate the device is in zero mode. Press and hold for 3 seconds to enable or disable sound. The icon on LCD will be displaced accordingly. The buzzer alarming could be set at different accuracy level. Refer to section “Angle Alarming”. Serves as th
8、e upward key for option selection. HOLD When pressed, the current value will freeze; the unit iconflashes to indicate the reading is on hold. Serves as the downward key at menu mode SET Press and hold for 3 seconds to enter MENU mode, for set mode options. Serves as the Set key. ANGLE *DX
9、L360S/C only Any angle measurement start button. Refer to section “Any Angle” Press and hold for 3 seconds to enter MENU mode, for set mode options. Serves as the Set key. LCD Icons Representations Battery status indication icons These icons indicate the battery level. There are 3 levels r
10、epresenting empty, half and full. In dual-axis mode, the LCD displays the direction of tilt graphically. It will show as E bubble to display the direction of tilt Degree mode. Flash when unit is in HOLD mode mm/M, the height of one end for 1m long plate. *DXL360S/C Only Gradient % mode.
11、 Flash when unit is in HOLD mode Sound notification on. Blank as off Show this logo as relative value is showing. When the Zero button is pressed, the unit reset current angle to zero. Direction of tilt icons, show the tilt angle direction Dual-Axis Mode. Both the X and Y axis angle wil
12、l be showed. Dual axis mode measures inclination up to +-40 degree for each axis before it automatically switch to single axis mode. Single Axis Mode. Measure slope up to +-90 degree. The triangle icon indicates the direction of tilt with respect to the bottom right corner of the unit. Battery
13、Charging It has a built in Lithium Ion rechargeable battery. A standard charger is supplied that the input voltage is 110V to 240V AC, 50/60Hz, and the output is 5V DC, 500mA. The charger operating procedure is list below: 1) Plug the Charger into AC socket, the RED indicator on the charger shou
14、ld turned ON, 2) Plug the USB charging cable to the Charger, 3) Insert the other end of the USB cable to the unit, 4) The battery icon on the LCD blinks to indicate charging in process. Upon charging complete, the icon stops blinking. 5) The charging time is approx. 3 hours. The unit could al
15、so be charged by connecting the USB cable to the unit and a computer’s USB port. This has the same effect when charging the unit with the provided adaptor. Note: When the unit is turned OFF, and plug in the USB charge cable, the LCD will no show anything, it is NORMAL. Once the unit is turned ON, t
16、he battery icon should flash indicating the unit is in charging mode. Relative/ Absolute Measurement Relative Measurement LCD Icon: Absolute Measurement LCD Icon: Blank Relative and Absolute Mode Switching: 1 Press and release the “ZERO” key to set the relative measurement zero point
17、 2 Press and release the “ZERO” key to cancel the relative zero point and back to absolute measurement mode. Hold Function Holding Mode: LCD Icon blinking: Holding function: 1. Press and release the “HOLD” key to activate holding function, digit will freeze. 2. Press and release the “HOLD”
18、key to cancel the holding function. Auto Power Off For no movement in 30 minutes, the unit will power off. Or we can set to never sleep mode at below instruction. Power auto off setting: 1. Press and hold “SET” / “ANGLE” key and enter MENU mode 2. Select “POWER” by “ZERO” and “HOLD” key, pr
19、ess “SET” key to enter Power mode 3. Scroll “NEVER” or “30MIN” by “ON/OFF” and “HOLD” key 4. Press “SET” key to confirm NEVER or 30MIN (30 minutes) sleep Restore Factory Setting When you find that the unit is abnormal, you can restore the unit to factory setting. All calibration setting will
20、be restored to factory setting. *Not suggest restore to factory setting in normal status, for accuracy drift, please follow Calibration. After factory set, please redo calibration to ensure the accuracy. Restore to factory setting: 1. Press and hold “SET” / “ANGLE” key and enter MENU mode 2. Sel
21、ect “FACTORY SET” by “ZERO” and “HOLD” key, press “SET” key to enter FACTORY SET mode 3. Scroll “YES” or “NO” by “ZERO” and “HOLD” key 4. Press “SET” key to confirm Angle Alarming BUZZER >SINGLE : 0 0 . 0 0 DUAL. X: 0 0 . 0 0 DUAL. Y: 0 0 . 0 0
22、 RANGE : 0 0 . 5 0 ACTIVE : IN OUT Alarming Mode: LCD Icon: Alarming Angle setting: 1. Press and hold “SET” / “ANGLE” key and enter MENU mode 2. Select “BUZZER” by “ZERO” and “HOLD” key, press “SET” or “ANGLE” key to enter BUZZER setting
23、 Press and hold “ZERO” and “HOLD” key for fast scrolling the digit. 3. Press “SET” or “ANGLE” to enter setting value SINGLE Vertical / Single axis mode alarming angle (Degree) DUAL.X Horizontal/ Dual axis mode X axis alarming angle (Degree) DUAL.Y Horizontal/ Dual axis mode Y axis ala
24、rming angle (Degree) RANGE The range (Degree)that will trigger the audible alarming For example: SINGLE. set to 20.00 RANGE set to 01.00 While the unit is in +19° to +21°or -19 ° to -21°, the unit will alarm ACTIVE IN or OUT to set the alarm will alarm in of range or out of range Calib
25、ration Calibrate the unit, once you found that there is accuracy drift on the unit. You can verify the accuracy at below step: At Step1, you measured X and Y value, X1 and Y1 At Step2, you measured X2 and Y2, in theory X1=-X2, Y1=-Y2. If the error is too large, you can enter calibration mode
26、 to eliminate the error Accuracy drift is causing by large ambient temperature change (5 to 10 Degree Celsius) or the unit has been dropped. Calibration Procedure: Step 1: Press and hold the “SET” or “ANGLE” key enter Menu mode. Select “Calibration” mode, press “SET”. Place the unit on a fl
27、at table (no need perfect level table) LCD display “CALIBRATE DUAL AXIS PRESS SET”, press “SET” and buzzer will beep; wait until the beep sound stop. While the buzzer is beeping keep the unit stable. Step 2: Then rotate the unit 180 degree with the other side against the same place. Press the Set
28、button again, and wait for the beep finished. Step 3: LCD display “CALIBRATE HORIZONTAL PRESS SET”. Place the unit horizontal like the picture “STEP 3” and then press “SET”, wait until the beep sound stop. Step 4: Then rotate the unit 180 degree at the same place. Press the “ZERO” button again
29、, and wait for the beep finished. Step 5: LCD display “CALIBRATE VERTICAL PRESS SET”, mention that the ON/OFF Key at upper side, hold on a flat wall. And then press “SET” Key. Wait for the “Beep” sound stop. Step 6: Then rotate the unit 180 degree with the other side against the same place
30、of wall (ON/OFF Key at upper side). Press the Set button again, and wait for the beep finished. Now, the LCD should go back to the selection menu. The calibration is done, by selecting “Back” to go back for normal operation ANY ANGLE measurement: *DXL360S/C only Any angle measurement is using
31、gyro technique. You can measure the angle between two faces, not only in earth gravity direction. 1) Press Angle key at the first face, and then rotate slowly and must keep the rotation axis to another testing face 2) It will then show the angle once you not move the unit. The rotation axis:
32、 Any Angle Measurement Method: Example: Measure angle between two wooden walls is 88.9° Calibrate Gyro *DXL360S 1) Place Unit At Flat Table And then Press Set 2) Flip 360 degree in clockwise and then press set Please rotate slowly to increase the accuracy 3) Place uni
33、t at flat table and then press set 4) Flip 360 degree counter clockwise and then press set Please rotate slowly to increase the accuracy PC Communication It has a PC data logging function. For DXL360SC you can directly plug the USB cable between PC and protractor by mini USB cable
34、 For DXL360/S You can not directly plug the USB cable between PC to protractor by a general USB cable. You need to optional purchase the PC adapter SVRS232 You can continue to data logging X and Y inclination data to PC. Sampling time is around 2 Hz. Specification: 1) RS232 Com Port 9600 ba
35、ud rate 2) USB connection ( include a RS232 to USB adapter) 3) Format will output ASCII: example for x is 0, Y is -88.88 X+0000Y-8888 Detail can visit our website or contact our sales person. DXL360/S/C V2 数字角度尺使用说明书 产品特点: 1) DXL360S/C: 高精度 ±0.05°, 高分辨率 0.01° DXL360: 精度±0.1°, 分
36、辨率 0.02°, 详情参阅说明书。 2) 可测单轴、双轴倾斜角度,大屏LCD清晰显示角度。 3) 充电功能 4) 外壳V槽设计可以轻松放置在拐角和圆管上。 5) 底面和四周均有磁铁 6) 可对指定角度设定蜂鸣报警 7) 可任意物体之间的角度*只有DXL360s/c具有此功能* 8) 通过USB可以连接至电脑 *只有DXL360sc 具有此功能,DXL360/s需要外接USB转接器* 产品规格 产品精度: DXL360S/C: 0 至 20°: ± (0.05°) 20至70°: ± (0.1°) 70至90°: ± (0.05°)
37、 DXL360: 0至20°: ± (0.1°) 20至70°: ± (0.2°) 70至90°: ± (0.1°) *校正之后的精度* 测量范围: Single axis: 360°, Dual axis: ±40° 分辨率: DXL360S/C: 0.01° DXL360: 0.02° 任意物体之间角度测量 精度 *DXL360s/c: 0.5° 陀螺仪旋转速度 *DXL360s/c: <50°/s 响应时间:
38、 <0.4 秒 蜂鸣音量: 60dB @ 30cm 角度尺零度的时候每°C角度偏差: 0.0058° (一般状态) 使用温度: 0 至 50°C 储存温度: -10 至 60°C 用户界面: 背光单色 LCD 供电电源: 充电锂离子电池I3.7V 充电器接口: 5V 500mA Mini B类型 USB接口 产品功耗: 待机时: 10uA, 使用时: 20mA. 待机时电池续航时间: 4000 小时
39、 使用时电池续航时间: 40 小时 尺寸 (mm): 70(长) x 70(宽) x 23(高) 磁力座: 设置在四个角上 磁性强度: N48 重量: 120g 按键功能 按键 功能详解 普通模式 菜单模式 POWER 普通操作时, 这个按键主要用于开关角度尺. 菜单模式下相当于离开功能。 ZERO 按下按键当前角度将被设置成零; 以后的测量将以此为零基准. LCD 上会显示三角图标“”,i提示用户现在处于ZERO模式下。 按下并保持3秒用于
40、设置或取消蜂鸣功能. LCD屏幕上显示图标 “ ”。 可以对任意角度设置蜂鸣报警.。 详解查阅 “角度报警”. 在菜单模式下当“向上”按键 HOLD 按下此按键后LCD会锁定显示按下时角度;屏幕上图标“”会闪烁,表示当前角度读数被锁定。 在菜单模式下当“向下”按键 SET*DXL360专有 按住并保持3秒进入菜单模式,设置各项参数。 在菜单模式下当“确定”按键 ANGLE *DXL360s/c 专有 任意物体间角度测量按键,详解参阅 “任意物体间角度”。 按住并保持3秒进入菜单模式,设置各项参数。 在菜单模式下当“确定”按键. LCD 显示图标说明
41、 电池状态指示图标: 用于指示当前电池状态。分别指示电池三种状态 没电,一半 ,满电. 在双轴角度测试模式下, LCD 会显示当前图标模拟角度水泡,演示倾斜方向. 角度模式. 闪烁时候表示进入锁定角度状态 mm/M, 将角度转换为一米外对应的高度单位是毫米. *DXL360S/C 斜度 % 模式. 在Hold模式下会闪烁。 显示时候表示会蜂鸣, 消失表示取消。 表示当前显示的所有角度是相对的。 当 Zero按键按下时, 会将当前角度设置为零角度,并依此为水平基准。 单轴角度测试模式, 模拟水泡指示当前角度倾斜方向。 双轴角度测试模
42、式. X和Y两个方向的角度同时显示. 双轴角度模式测试范围为+-40度,超过测试范围会自动转换到单轴角度测试模式。 单轴角度测试模式. 测试倾斜范围为+-90度。 水泡指示当前角度倾斜的方向,如图表示当前角度是向左边倾斜。 电池充电器 该仪器使用了锂离子充电电池. 充电器标准输入电压 110V 至 240V 交流(AC), 50/60Hz, 输出电压为 5V 直流DC, 电流500mA. 充电器操作步骤如下: 6) 将充电器接入直流插座, 此时红色指示灯会亮。 7) 将USB线接入充电器的USB接口。 8) 将USB线另一端接入角度尺。 9) 角度尺屏幕上的电池图标
43、会闪烁表示正在充电,充电完成后图标会停止闪烁。 10) 充电时间大约为3小时。 角度尺也可以通过USB线连接至电脑进行充电,这和使用充电器的效果相同。 注意:当角度尺处于关机状态时,将角度尺连接至充电器充电时,LCD屏幕会亮但不会显示任何东西, 这是正常现象。 只要打开角度尺,屏幕上的电池图标就会闪烁表示当前正在充电。 相对/绝对角度测量 相对角度测量 LCD图标: 绝对角度测量 LCD 图标:空白不显示 相对角度模式和绝对角度模式切换方法: 3 按下 “ZERO” 按键设置相对零度进入相对角度测试模式。 4 再次按下 “ZERO” 按键取消相对零度 回到
44、绝对角度测试模式。 角度锁定功能 锁定模式: LCD 图标这个闪烁: 角度锁定功能使用方法: 3. 按下“HOLD” 按键进入角度锁定功能,当前角度将锁定一直显示在屏幕上。 4. 再次按下 “HOLD” 按键即可取消角度锁定功能。 自动关机功能 半小时不适用角度尺,角度尺会自动关机。 也可以通过以下操作取消自动关机功能。 自动关机功能设置方法: 1. 长按 “SET”或 “ANGLE” 按键进入菜单模式。 2.使用”ZERO”和”HOLD”两个按键移动光标选择“POWER”选项, 按下 “ANGLE”按键进入电源设置。 3.使用 “ZERO” 和 “HOL
45、D” 按键选择“NEVER” 或“30MIN”选项。 4. 按下“ANGLE”确认当前选择,是永不关机或者半小时自动关机。 恢复出厂设置 当您使用的角度尺感觉有异常时,可以使用恢复出厂设置对角度尺进行重置。 所有校准设置将全部恢复到出厂时的状态. *正常状态时候不建议恢复出厂设置。 如果是精度漂移,请对角度尺进行 校正. 在恢复出厂设置后, 请重新校正以保证精度正常。. 恢复出厂设置方法: 1. 长按 “SET”或 “ANGLE” 按键进入菜单模式。 2. 使用”ZERO”和”HOLD”两个按键移动光标选择“FACTORY SET” 选项,按下 “ANGLE”按键进入恢复出
46、厂设置。 3. 使用 “ZERO” 和 “HOLD” 按键选择“YES” 或“NO” 。 4. 按下“ANGLE”确认当前选择。 角度报警功能 BUZZER >SINGLE : 0 0 . 0 0 DUAL. X: 0 0 . 0 0 DUAL. Y: 0 0 . 0 0 RANGE : 0 0 . 5 0 ACTIVE : IN OUT 报警模式: LCD 图标: 报
47、警角度设置方法: 1. 按住 “SET”/”ANGLE” 按键不要松手进入菜单模式,然后放手。 2. 使用”ZERO”和”HOLD”两个按键移动光标选择“BUZZER” 选项, 按下 “ANGLE”按键进入报警角度设置。 按住 “ZERO” 或 “HOLD” 按键不放手 f可以快速滚动数字。 3. 按下 “SET” 或 “ANGLE” 确定当前设置角度。 SINGLE 垂直 /单轴角度报警模式(度) DUAL.X 水平l/双轴角度报警模式X轴角(度) DUAL.Y 水平l/双轴角度报警模式Y轴角(度) RANGE 触发报警发声范围(度) 例如: SINGL
48、E. 设置为 20.00 RANGE 设置为 01.00 当角度尺处于 ( +19° 至 +21°)或( -19 °至 -21°), 角度尺会报警。 ACTIVE IN 或 OUT 用于设置是在范围内报警还是在范围外报警 角度尺精度检验 校正角度尺,一旦您发现角度尺的角度有误差时,你可以按如下步骤检验角度尺精度: 第一步, 您测量一个X 和Y 的角度值, X1 和 Y1 第二步, 原地旋转180度测量新角度值 X2 和 Y2, 理论上应该得到 X1=-X2, Y1=-Y2。 如果误差过大, 你可以进入校正模式校正误差。 精度误差可能是由于过大的温度变化造成
49、(5 到10 摄氏度) 或者角度尺被摔过受到大的外力冲击。 精度校正程序: 步骤一: 长按 “SET”或 “ANGLE” 按键进入菜单模式. 选择“Calibration” 选项, 按 “SET”或 “ANGLE” 按键. 将角度尺放置于一个平整的水平面 (只要一个大致水平的平面) LCD会显示 “CALIBRATE DUAL AXIS PRESS SET”, 按 “SET”或 “ANGLE” 按键 此时蜂鸣会响; 等待直到蜂鸣停止发声. 当蜂鸣响的时候请保持水平尺稳定. 步骤二: 然后旋转180度放置于相同的位置。再次按 “SET”或 “ANGLE” 按键, 等待直到蜂鸣停止
50、发声。 步骤三: LCD 屏幕显示 “CALIBRATE HORIZONTAL PRESS SET”. 请竖直放置水平尺 如图 “步骤三” 。再次按 “SET”或 “ANGLE” 按键, 等待直到蜂鸣停止发声。 步骤四: 以当前状态再次旋转180度放置于相同地方. 再次按 “SET”或 “ANGLE” 按键, 等待直到蜂鸣停止发声。 步骤五: LCD 屏幕显示“CALIBRATE VERTICAL PRESS SET”,开机键朝上垂直放置一个较平的墙面上. 再次按 “SET”或 “ANGLE” 按键, 等待直到蜂鸣停止发声。 步骤六: 旋转180度依然放置垂直于墙面 (此时
51、开机键应依然朝上). 再次按 “SET”或 “ANGLE” 按键, 等待直到蜂鸣停止发声。至此, LCD屏幕应该回到菜单显示状态。此时表示校准程序完成。然后选择餐单中“Back”选项回答正常操作模式。 任意物体间角度测量: *DXL360S/C 专有 任意物体间角度测量运用的是陀螺仪技术。 您可以测量两个面之间的角度, 不仅仅在地球重力的方向上。. 3) 在第一个面上按“ANGLE”按键, 慢慢旋转至您需要测量的第二个面上。 4) 当你停止移动时候会显示旋转的角度。 旋转轴如图: 任意面角度测量: 例如: 测量两个夹角为88.9°的木墙。
52、 校准陀螺仪 *DXL360S/C 5) 放置于一个较平的平面 然后按“ANGLE”按键 6) 拿起来慢慢向右旋转360度然后按下“ANGLE”按键。请在旋转时候保持慢速以保证精度。 7) 放置于一个较平的平面 然后按“ANGLE”按键 8) 拿起来慢慢向左旋转360度然后按下“ANGLE”按键。请在旋转时候保持慢速以保证精度。 连接至电脑 角度尺具有电脑数据连接功能 DXL360SC您可以通过Mini USB接口使用USB数据线直接连接至电脑进行数据传输。 DXL360/S 您不可以通过Mini USB接口使用USB数据线直接连接至电脑进行数据传输 您需要购买电脑转接器 SVRS232 您可以持续将X 和 Y角度数据发送至 电脑。. 采样速度大约为 2 Hz. 说明: 4) RS232 接口的波特率为9600 5) USB 连接线 ( 包含 RS232转USB模块) 6) 输出格式为 ASCII: 例如X为 0, Y为-88.88传输电脑的格式为X+0000Y-8888 详情可登陆我们网站或联系我们销售人员。 专心---专注---专业
- 温馨提示:
1: 本站所有资源如无特殊说明,都需要本地电脑安装OFFICE2007和PDF阅读器。图纸软件为CAD,CAXA,PROE,UG,SolidWorks等.压缩文件请下载最新的WinRAR软件解压。
2: 本站的文档不包含任何第三方提供的附件图纸等,如果需要附件,请联系上传者。文件的所有权益归上传用户所有。
3.本站RAR压缩包中若带图纸,网页内容里面会有图纸预览,若没有图纸预览就没有图纸。
4. 未经权益所有人同意不得将文件中的内容挪作商业或盈利用途。
5. 装配图网仅提供信息存储空间,仅对用户上传内容的表现方式做保护处理,对用户上传分享的文档内容本身不做任何修改或编辑,并不能对任何下载内容负责。
6. 下载文件中如有侵权或不适当内容,请与我们联系,我们立即纠正。
7. 本站不保证下载资源的准确性、安全性和完整性, 同时也不承担用户因使用这些下载资源对自己和他人造成任何形式的伤害或损失。
